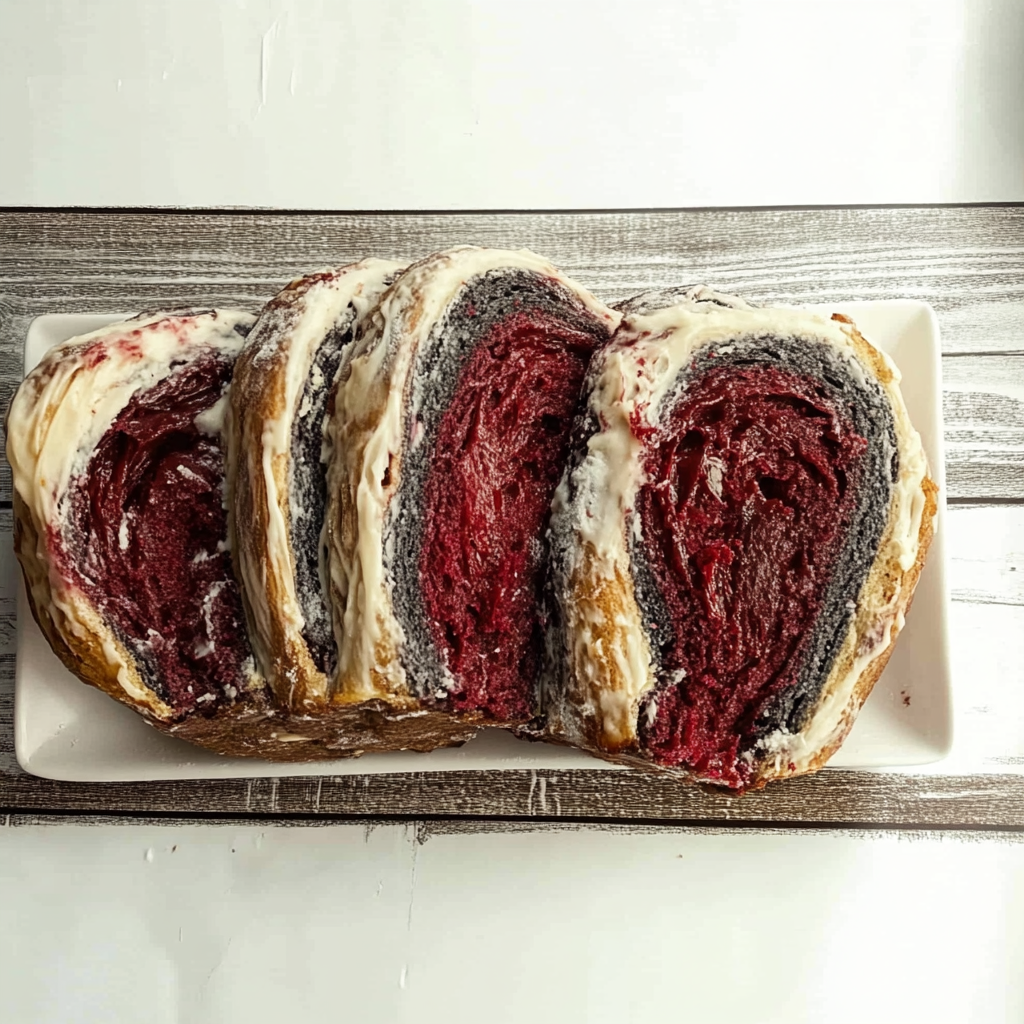
Vampire Bread
Vampire Bread is a delightful and spooky treat that adds excitement to any Halloween celebration or fall gathering. This eye-catching loaf features swirls of vibrant black and red dough, making it a standout centerpiece for your table. With its soft, slightly sweet crumb, Vampire Bread is perfect for serving plain, toasted with cinnamon, or as the foundation for whimsical sandwiches. Whether you choose to make it by hand or use a bread machine, this festive recipe is sure to impress your guests and bring joy to your festivities.
Why You’ll Love This Recipe
- Eye-catching Appearance: The striking colors of black and red create a fun visual that enhances any Halloween spread.
- Versatile Serving Options: Enjoy this bread plain, toasted with butter, or transformed into spooky sandwiches.
- Easy to Make: Whether using a bread machine or traditional methods, this recipe simplifies the bread-making process.
- Family-Friendly Fun: Involve the kids in kneading and coloring the dough for an engaging activity.
- Allergen-Friendly: This recipe avoids common allergens while still delivering delicious flavor.
Tools and Preparation
To create Vampire Bread, you’ll need some essential tools that will make the process smoother and more efficient.
Essential Tools and Equipment
- Stand mixer (optional)
- Mixing bowls
- Measuring cups and spoons
- Tea towels
- Parchment paper (for lining)
- Loaf pan
Importance of Each Tool
- Stand mixer: Speeds up the mixing process and makes kneading effortless with its dough hook attachment.
- Measuring cups and spoons: Ensure accurate ingredient measurements for perfect results every time.
- Tea towels: Help keep the dough warm during rising stages without drying it out.
Ingredients
For the Dough
- 1 cup hot reduced fat milk
- 1 egg yolk
- 3 cups all-purpose flour
- 2 ½ tablespoons sugar
- 2 ¼ teaspoons active dry yeast
- 1 ½ tablespoons butter
- 1 teaspoon salt
For Coloring
- Black food coloring
- Red food coloring
How to Make Vampire Bread
Step 1: Prepare the Milk Mixture
In a small bowl, whisk together the hot milk and egg yolk. If needed, microwave for an additional 25–30 seconds to warm further. Set aside.
Step 2: Mix Dry Ingredients
In a large bowl or stand mixer bowl, whisk together the flour, sugar, and yeast until well combined.
Step 3: Combine Ingredients
Add the warm milk mixture along with butter and salt to the dry ingredients. Stir until everything comes together.
Step 4: Knead the Dough
Knead the dough by hand for about 10 minutes or use a dough hook in a stand mixer for approximately 5 minutes until smooth.
Step 5: Divide the Dough
Divide the kneaded dough into 2 or 3 equal portions. Place each portion into separate bowls, cover them with a tea towel, and let them rest briefly.
Step 6: Color the Dough
Add black food coloring to one portion and red food coloring to another (or as desired). Knead each piece until fully colored.
Step 7: First Rise
Cover all portions again with tea towels and let rise in a warm place until doubled in size—around 1.5 hours.
Step 8: Punch Down Dough
Once risen, punch down each piece of dough gently and transfer them onto a lightly floured surface.
Step 9: Prepare for Shaping
If desired, divide each portion again into four smaller pieces for more pronounced color layers. Add more food coloring if needed.
Step 10: Roll Out Dough
Roll each piece into an approximate rectangle measuring 8×4 inches. Stack them according to your preferred color order.
Step 11: Form the Loaf
Carefully roll tightly from one short end to form a loaf shape. Place it into a greased or parchment-lined loaf pan.
Step 12: Second Rise
Cover again with tea towels and let rise until doubled—this should take about an hour.
Step 13: Preheat Oven
While your dough is rising, preheat your oven to 375°F (190°C).
Step 14: Bake
Bake in your preheated oven for about 30 minutes or until you hear a hollow sound when tapping on the bottom of the loaf.
Step 15: Cool Before Slicing
Let your Vampire Bread cool completely before slicing it into approximately twelve pieces. Enjoy!
How to Serve Vampire Bread
Vampire Bread is not just visually appealing, but it also offers a versatile base for various delicious bites. Whether you want to prepare a spook-tacular snack or serve it alongside a meal, there are plenty of creative ways to enjoy this festive loaf.
Toasted with Cinnamon
- Toast slices of Vampire Bread and sprinkle with cinnamon sugar for a warm, sweet treat.
- Serve with butter or cream cheese for an extra layer of flavor.
Creepy Sandwiches
- Use slices for fun sandwiches filled with turkey or chicken salad.
- Cut into spooky shapes using cookie cutters for a Halloween twist.
Dipped in Soups
- Pair Vampire Bread with hearty soups like pumpkin or tomato bisque.
- Tear off pieces and dip them into the soup for a comforting experience.
Sliders on Vampire Bread
- Make mini sliders using small sections of Vampire Bread as buns.
- Fill with ground beef or turkey patties and your favorite toppings.
Charcuterie Board Addition
- Slice the bread into bite-sized cubes and add to a charcuterie board.
- Pair with cheeses, fruits, and spreads for a festive appetizer.
As a Dessert Base
- Create dessert toast by spreading nut butter or chocolate spread on toasted slices.
- Top with sliced fruits like bananas or strawberries for added sweetness.
How to Perfect Vampire Bread
Making the perfect Vampire Bread can be easy with some helpful tips. Here are some suggestions to enhance your baking experience.
- Use fresh yeast: Always check the expiration date on your active dry yeast for best results.
- Knead well: Ensure the dough is smooth and elastic by kneading thoroughly; this improves texture.
- Temperature matters: Let your dough rise in a warm area; you can even preheat your oven slightly and turn it off before placing the dough inside.
- Color evenly: Mix food coloring well into each portion of dough to achieve vibrant swirls throughout the bread.
- Keep covered: Covering the dough while it rises prevents it from drying out, ensuring a better texture.
- Cool completely: Allow the bread to cool fully before slicing; this helps maintain its structure and prevents squishing.
Best Side Dishes for Vampire Bread
Vampire Bread pairs wonderfully with various side dishes that complement its unique flavors. Here are some excellent options to consider serving alongside it.
- Pumpkin Soup
A creamy pumpkin soup provides warmth and richness that balances the sweetness of the bread. - Garden Salad
A fresh garden salad adds crunch and freshness, offering contrast to the soft bread texture. - Roasted Vegetables
Seasoned roasted vegetables bring depth and heartiness that pairs nicely with slices of Vampire Bread. - Stuffed Peppers
Colorful stuffed peppers filled with seasoned rice and ground turkey make an eye-catching side. - Chili
A hearty chili made from beans and ground meat is perfect for dipping pieces of Vampire Bread. - Guacamole
Creamy guacamole served alongside crispy tortilla chips makes an excellent starter before enjoying the main dish. - Fruit Salad
A light fruit salad adds a refreshing touch that complements the sweetness of the bread beautifully. - Spicy Hummus
Serve Vampire Bread with spicy hummus for a delightful dip option that adds zing to your meal.
Common Mistakes to Avoid
Making Vampire Bread can be fun, but there are common pitfalls to watch out for.
- Bold phrase: Skipping the yeast proofing. Always let the yeast activate in warm milk before adding to the flour for better rise.
- Bold phrase: Not kneading enough. Ensure you knead the dough thoroughly for a soft texture; under-kneaded dough can lead to dense bread.
- Bold phrase: Ignoring rising times. Allow the dough to double in size as indicated; rushing this step can yield flat bread.
- Bold phrase: Using incorrect food coloring proportions. Always measure your food coloring carefully to achieve the right vibrant hues without overpowering the flavor.
- Bold phrase: Not preheating the oven. Preheat your oven properly before baking to achieve an even cook and perfect crust.
Storage & Reheating Instructions
Refrigerator Storage
- Store Vampire Bread in an airtight container.
- It will last up to 5 days in the refrigerator.
Freezing Vampire Bread
- Wrap slices tightly in plastic wrap or foil.
- Place in a freezer-safe bag; it can be frozen for up to 3 months.
Reheating Vampire Bread
- Oven: Preheat to 350°F (175°C). Wrap bread in foil and warm for about 10-15 minutes.
- Microwave: Heat slices on high for 10-15 seconds at a time until warm. Avoid overheating, as it can dry out.
- Stovetop: Toast slices on a skillet over medium heat for 1-2 minutes per side, making them crispy.
Frequently Asked Questions
Here are some common questions about making Vampire Bread.
Can I use different colors for Vampire Bread?
Yes! Feel free to experiment with other food colors to create your unique designs.
How can I customize my Vampire Bread?
You can add spices like cinnamon or nutmeg for added flavor or mix in chocolate chips or nuts for a twist.
Is Vampire Bread suitable for parties?
Absolutely! Its eye-catching appearance makes it a great addition to any Halloween party or fall gathering.
What if my dough doesn’t rise?
Make sure your yeast is fresh and that you’re using warm—not hot—liquid. Also, check that your rising environment is warm enough.
How do I know when Vampire Bread is done baking?
The bread should sound hollow when tapped on the bottom and have a golden-brown crust.
Final Thoughts
Vampire Bread is not only visually stunning but also versatile. You can serve it as a snack, toast it with butter, or use it as a base for spooky sandwiches. Don’t hesitate to get creative with colors and flavors—it’s all part of the fun!
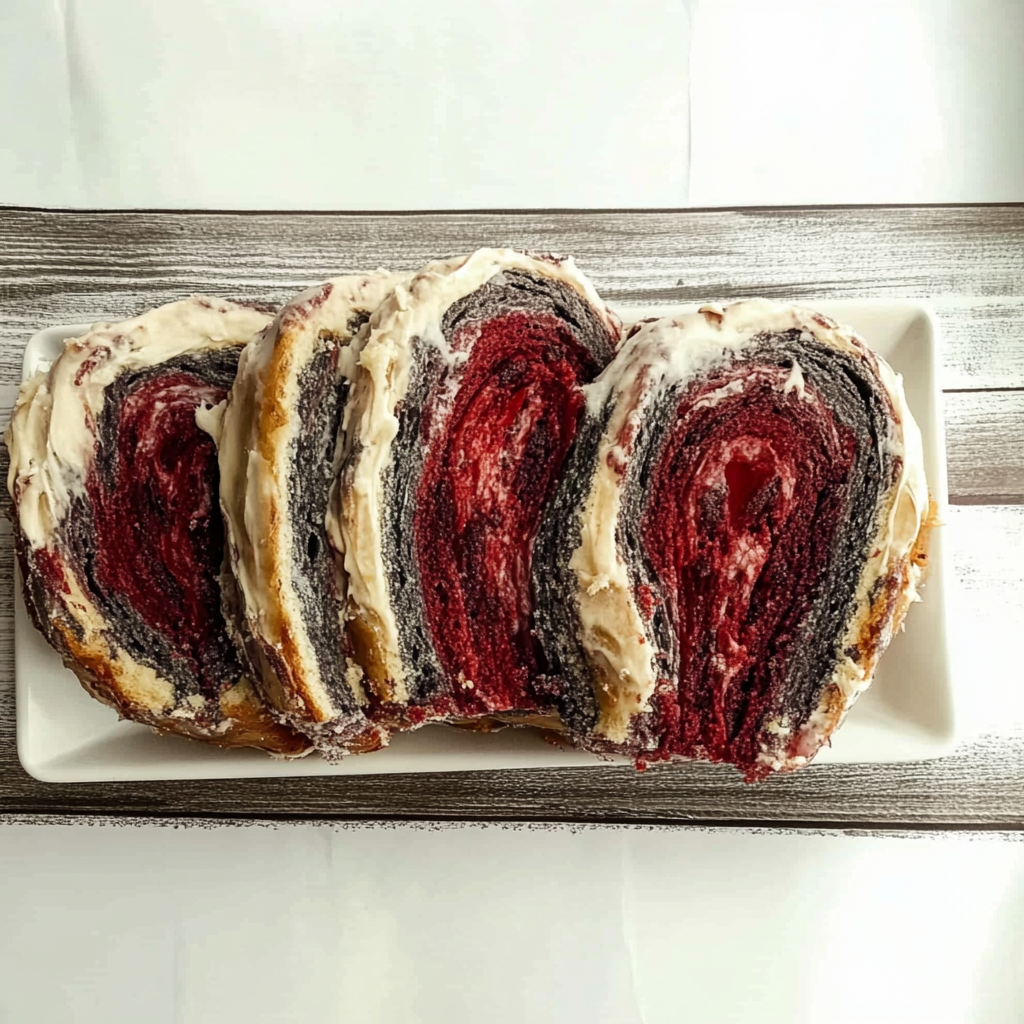
Vampire Bread
Vampire Bread is a festive and visually striking treat that will elevate your Halloween gatherings or fall festivities. This whimsical loaf features enchanting swirls of bold black and red dough, making it an eye-catching centerpiece on any table. With its soft, slightly sweet crumb, Vampire Bread is perfect for toasting with butter, crafting creative sandwiches, or simply enjoying as a delightful snack. Whether you decide to make it by hand or use a bread machine, this easy-to-follow recipe brings festive cheer to your baking adventures.
- Prep Time: 30 minutes
- Cook Time: 30 minutes
- Total Time: 1 hour
- Yield: Approximately 12 servings 1x
- Category: Bread
- Method: Baking
- Cuisine: American
Ingredients
- 1 cup hot reduced fat milk
- 1 egg yolk
- 3 cups all-purpose flour
- 2 ½ tablespoons sugar
- 2 ¼ teaspoons active dry yeast
- 1 ½ tablespoons butter
- 1 teaspoon salt
- Black food coloring
- Red food coloring
Instructions
- In a small bowl, whisk together the hot milk and egg yolk; set aside.
- In a large bowl or stand mixer, combine flour, sugar, and yeast.
- Add the warm milk mixture along with butter and salt; stir until combined.
- Knead the dough by hand for about 10 minutes or with a stand mixer for about 5 minutes until smooth.
- Divide the dough into portions, cover with tea towels, and let rest briefly.
- Color one portion black and another red using food coloring; knead until fully integrated.
- Allow each portion to rise in a warm place until doubled in size (about 1.5 hours).
- Punch down the dough and roll out each piece into rectangles.
- Stack colored rectangles and roll tightly into a loaf shape; place in a greased loaf pan.
- Let rise again until doubled (about an hour), then bake at 375°F (190°C) for around 30 minutes.
Nutrition
- Serving Size: 1 serving
- Calories: 120
- Sugar: 3g
- Sodium: 150mg
- Fat: 3g
- Saturated Fat: 1g
- Unsaturated Fat: 2g
- Trans Fat: 0g
- Carbohydrates: 21g
- Fiber: 0g
- Protein: 4g
- Cholesterol: 20mg